

Transform your kitchen into a mini dairy by starting with cultured butter—simply let heavy cream sit at room temperature for 12-24 hours, then whip it in a stand mixer until the butterfat separates from the liquid, drain, and salt to taste. This single project delivers restaurant-quality results with minimal equipment and introduces you to the satisfying world of homemade dairy.
Making dairy products at home isn’t just about nostalgia or saving money—it’s about reclaiming control over what goes into your food while discovering surprisingly simple techniques that turn everyday ingredients into artisan-quality staples. Most dairy projects require nothing more than milk, heat, and patience, making them perfect weekend experiments that yield tangible, delicious results within hours.
Whether you’re drawn to the five-minute magic of fresh ricotta, the cultured complexity of homemade yogurt, or the aged satisfaction of simple cheeses, dairy crafting offers immediate gratification alongside opportunities for deeper exploration. These projects scale beautifully to your available time and ambition—spend 20 minutes making cream cheese for your morning bagel, or commit to a full day of mozzarella-making that transforms pizza night forever.
The beauty of homemade dairy lies in its forgiving nature and quick feedback loop. Unlike renovating a bathroom or refinishing furniture, you can attempt a new cheese variety this weekend and serve it at dinner, learning and adjusting with each batch while building genuine kitchen expertise that impresses guests and elevates everyday meals.
Why Your Kitchen Is Perfect for Dairy Crafting
Here’s a secret that might surprise you: your kitchen is probably already set up for making dairy products. You don’t need a fancy creamery or specialized equipment to start crafting butter, yogurt, or fresh cheese at home. In fact, that countertop space you’re already using for meal prep doubles perfectly as your dairy workshop.
Think about what’s already in your cabinets. A sturdy pot? Check. A whisk or wooden spoon? Got it. Mason jars or food-safe containers? Likely sitting in your pantry right now. These everyday tools are exactly what you need to begin your dairy crafting journey. The same blender you use for morning smoothies can churn cream into butter in minutes, and that slow cooker gathering dust can maintain the perfect temperature for yogurt making overnight.
When choosing kitchen appliances, you might not have realized how versatile they could be beyond standard cooking tasks. Your stand mixer, for instance, becomes a butter churner with the whisk attachment. Your instant pot transforms into a precise temperature-controlled environment for culturing dairy.
The beauty of home dairy production is that it scales to fit your space. Whether you’re working with a compact apartment kitchen or a sprawling culinary haven, you can adapt these projects to your setup. A small corner of your counter and access to your refrigerator are really all you need to get started.
This accessibility is what makes dairy crafting such a satisfying DIY project. You’re not investing in specialized equipment or renovating your kitchen. You’re simply discovering new possibilities within the space you already have, maximizing the potential of tools you use every day.
Butter: The Gateway to Homemade Dairy

The Simple Shake Method
Ready to try your hand at homemade butter? The shake method is wonderfully forgiving and requires just one ingredient to get started. Pour heavy cream into a clean mason jar, filling it about halfway to leave room for movement. Seal the lid tightly and start shaking vigorously. This is where kids can jump in to help, turning it into a fun kitchen activity that teaches them where their food comes from.
After about 10 to 15 minutes of steady shaking, you’ll notice the cream thickening into whipped cream, then suddenly it’ll break apart into butter solids and buttermilk. Don’t worry if your arms get tired—you can pass the jar around or take short breaks. Once separated, drain off the liquid buttermilk, then rinse the butter under cold water while pressing it with a spoon to remove any remaining liquid. This rinsing step helps your butter stay fresh longer.
Add a pinch of salt if desired, and you’ve just created spreadable, creamy butter that tastes miles better than store-bought. Store it in the refrigerator in a covered container for up to two weeks.
Elevating Your Butter Game
Once you’ve mastered basic butter-making, it’s time to have some fun with flavors and textures that’ll make your guests wonder if you’ve secretly opened a gourmet creamery in your kitchen. The beauty of homemade butter is that it’s a blank canvas just waiting for your creative touch.
Start with cultured butter for that tangy, complex flavor you’d typically pay premium prices for at specialty shops. Simply add a few tablespoons of buttermilk or plain yogurt to your cream and let it sit at room temperature for 12-24 hours before churning. The result is a richer, more sophisticated spread that transforms ordinary toast into something extraordinary. If you’re producing your own cream with a milk separator machine, you’re already ahead of the game.
Compound butters are another impressive yet simple upgrade. Mix softened butter with fresh herbs like rosemary and thyme for steaks, or try honey and cinnamon for morning pancakes. Roll them into logs using parchment paper and refrigerate until firm. When dinner guests see you slice off perfect rounds of herb-studded butter, they’ll be amazed at your kitchen prowess.
For an elegant presentation, press edible flowers into softened butter using the back of a spoon, then chill. These beautiful pats elevate any bread basket from functional to memorable, proving that small touches make big impressions in both your kitchen and throughout your home.
Fresh Yogurt: Easier Than You Think
The Oven Light Trick
Here’s a kitchen hack that feels almost like magic: your oven becomes a perfect yogurt incubator without even being turned on. After you’ve finished baking dinner, your oven holds onto gentle residual heat for hours, creating an ideal cozy environment for yogurt cultures to thrive. Simply heat your oven to 200 degrees Fahrenheit, then turn it off completely. Wait about 10 minutes for it to cool slightly, place your prepared yogurt jars inside, and turn on just the oven light. That small bulb generates enough warmth to maintain the sweet spot temperature between 105-110 degrees. Leave your yogurt to work its transformation overnight, typically 8-12 hours, and wake up to perfectly set homemade yogurt. This method requires zero special equipment beyond what’s already built into your kitchen, making it wonderfully accessible for first-timers. Think of it as discovering a hidden feature in your home you never knew existed. The gentle, consistent warmth mimics those fancy yogurt makers without the counter clutter or expense, proving that sometimes the best tools are the ones you already own.
Greek-Style Straining Techniques
Transforming store-bought yogurt into luxurious Greek-style yogurt is surprisingly simple and requires nothing more than basic kitchen tools you probably already own. This process is all about removing excess whey to create that thick, velvety texture we love. Start by lining a fine-mesh strainer or colander with several layers of cheesecloth or a clean, lint-free kitchen towel. Place it over a large bowl to catch the liquid that drains away. Spoon your regular yogurt into the lined strainer, then cover loosely with plastic wrap. Pop the whole setup into your refrigerator for anywhere from 2 to 8 hours, depending on how thick you want your final product. The longer you strain, the thicker it becomes. For extra-thick consistency similar to labneh, let it strain overnight. You’ll notice the whey collecting in the bowl below while your yogurt transforms into a creamy, protein-rich spread perfect for breakfast bowls or savory dips. The best part? You can reuse the strained whey in baking or smoothies, making this a zero-waste kitchen win that feels both resourceful and rewarding.
Flavor Experiments Worth Trying
Once you’ve mastered basic yogurt making, the real fun begins with creative flavor experiments. Transform your plain yogurt into something extraordinary by stirring in honey and crushed lavender for a sophisticated afternoon treat, or fold in fresh lemon zest and a drizzle of vanilla extract for bright, bakery-inspired flavor. For breakfast enthusiasts, try layering your homemade yogurt with granola, maple syrup, and caramelized nuts you’ve toasted in your own kitchen. Feeling adventurous? Mix in savory elements like minced cucumber, dill, and garlic to create a tzatziki-style dip perfect for your next gathering. The beauty of DIY dairy is experimenting without preservatives or artificial flavors, giving you complete control over what goes into your body. Start simple with single-ingredient additions like jam or cocoa powder, then graduate to complex flavor profiles as your confidence grows.
Soft Cheeses That Don’t Intimidate

Ricotta in 30 Minutes
Ready to create fresh ricotta in your own kitchen? This surprisingly simple recipe delivers creamy, homemade cheese in just half an hour, transforming ordinary ingredients into something special. You’ll need 4 cups of whole milk, 2 tablespoons of white vinegar or lemon juice, and a pinch of salt.
Start by pouring the milk into a heavy-bottomed pot and heating it over medium heat until it reaches 185-190°F. If you don’t have a thermometer, watch for the milk to start steaming with tiny bubbles forming around the edges, but don’t let it boil. Remove from heat and stir in your acid of choice, watching as the milk magically separates into curds and whey within seconds.
Let the mixture rest for 5 minutes, then line a fine-mesh strainer with cheesecloth and gently ladle in the curds. Allow them to drain for 10-20 minutes depending on your desired consistency. A shorter drain time yields moister, spreadable ricotta perfect for toast, while longer draining creates a firmer texture ideal for lasagna or stuffed shells.
Season with salt to taste, and you’ve just created artisanal ricotta that rivals anything from the specialty cheese counter. Store it in an airtight container in your refrigerator for up to five days.
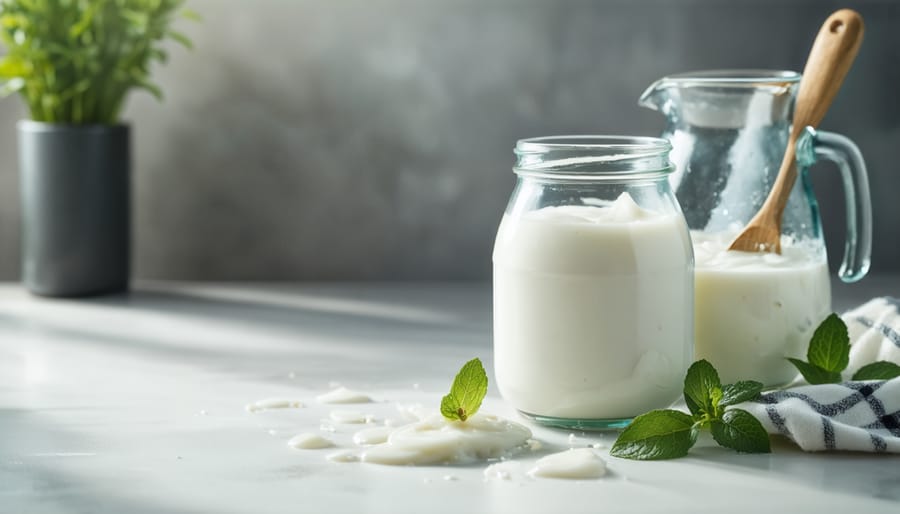
Cream Cheese for Your Morning Bagel
Making your own cream cheese is simpler than you might think, and the fresh flavor will transform your breakfast routine. You’ll need just two ingredients: heavy cream and whole milk, plus a starter culture like buttermilk or a squeeze of lemon juice to kickstart the process.
Start by warming one quart of whole milk and one cup of heavy cream in a heavy-bottomed pot to about 75 degrees Fahrenheit. Remove from heat and stir in a quarter cup of buttermilk or two tablespoons of lemon juice. Cover the pot with a clean kitchen towel and let it sit at room temperature for 12 to 24 hours until it thickens noticeably.
Once thickened, line a colander with cheesecloth and pour the mixture through. Gather the corners of the cloth and hang it over a bowl in your refrigerator for 8 to 12 hours, allowing the whey to drain completely. The longer you drain it, the thicker your cream cheese becomes.
Transfer your finished cream cheese to a container and add a pinch of salt. You can also experiment with mix-ins like fresh herbs, garlic, or honey. Store it refrigerated for up to two weeks and enjoy knowing you created this breakfast staple right in your own kitchen.
Paneer: Your International Kitchen Adventure
Ready to expand your DIY skills beyond paint swatches and furniture refinishing? Making paneer at home is surprisingly approachable and transforms your kitchen into an international culinary workshop. This fresh Indian cheese requires just two ingredients: whole milk and an acid like lemon juice or vinegar. Heat a half-gallon of milk until it nearly boils, then stir in three tablespoons of lemon juice and watch the magic happen as curds separate from whey. Strain through cheesecloth, rinse with cool water, and press for 15-20 minutes to create a firm block.
The beauty of paneer lies in its versatility. Cube it for curry dishes, crumble it into scrambled eggs for protein-packed breakfasts, or marinate and grill pieces as a vegetarian main course. It absorbs flavors beautifully while maintaining its shape during cooking, making it perfect for experimenting with different cuisines. The leftover whey doesn’t need to go to waste either—use it in bread recipes or garden fertilizer. This simple project delivers restaurant-quality results while giving you complete control over freshness and ingredients, perfectly aligning with that satisfying DIY accomplishment you crave in every home project.
Sour Cream and Crème Fraîche: The Tangy Twins
If you’re ready to add sophisticated tang and richness to your home cooking repertoire, sour cream and crème fraîche are your gateway to culinary elegance. These cultured cream products might sound fancy, but they’re surprisingly simple to make right on your kitchen counter, and they’ll transform everything from tacos to fancy French sauces.
The beauty of these tangy twins lies in their simplicity. To make sour cream at home, you just need heavy cream and a tablespoon of buttermilk or lemon juice as your starter culture. Mix them together in a clean jar, cover with a coffee filter or breathable cloth secured with a rubber band, and let it sit at room temperature for 12 to 24 hours. You’ll know it’s ready when it thickens to that familiar dollop-able consistency and develops that characteristic tang. Give it a stir, pop it in the fridge, and you’ve got fresh sour cream that’ll last about two weeks.
Crème fraîche follows the same basic process but uses just buttermilk as the starter, resulting in a milder, more luxurious cousin with a higher butterfat content. It’s incredibly forgiving too, sitting happily at room temperature for up to 24 hours without separating when heated, making it perfect for enriching soups and sauces.
Use your homemade sour cream for topping baked potatoes, tacos, and chili, or mix it into dips and dressings. Crème fraîche shines in pasta sauces, alongside fresh berries, or swirled into soups just before serving. Both add restaurant-quality richness to everyday meals, and there’s something deeply satisfying about making these sophisticated staples yourself. Your kitchen becomes a mini creamery, and your taste buds will definitely notice the fresh, vibrant difference.
Setting Up Your Dairy-Making Station
Creating a dedicated dairy-making station in your kitchen doesn’t mean you need a complete renovation or a commercial-grade setup. With some thoughtful organization, you can transform a corner of your counter into a productive dairy hub that seamlessly integrates with your everyday cooking space.
Start by identifying a section of counter near your sink and stove, ideally with easy access to water and heat sources. This spot becomes your command center for dairy projects. Consider using a rolling cart if counter space is tight—it provides flexibility and can be tucked away when you’re making dinner for the family. A two-tiered cart offers storage below for supplies while keeping your work surface clear.
Storage is key to maintaining an efficient setup without cluttering your kitchen. Designate one cabinet shelf or a deep drawer for your dairy-making essentials. Invest in clear, stackable containers to store cultures, rennet, and specialty ingredients. Label everything clearly with purchase dates, since freshness matters. A small basket can corral thermometers, muslin cloths, and utensils, making them grab-and-go ready for your next project.
Temperature control is crucial for dairy success, so keep a reliable instant-read thermometer within reach. A heavy-bottomed pot becomes your workhorse for heating milk, while a large glass bowl serves double duty for straining and mixing. Don’t forget about maintaining your kitchen appliances—your stove’s consistent heat makes all the difference.
For storage of finished products, proper refrigeration extends the life of your homemade butter, yogurt, and cheeses. Reserve one refrigerator shelf specifically for dairy creations, using glass containers with tight lids to prevent flavors from mingling with other foods.
The beauty of this setup is its adaptability. When you’re not making cheese, your station returns to regular kitchen duty, proving that great home improvements work with your lifestyle, not against it.
Troubleshooting Common Dairy Dilemmas
Even experienced home creamery enthusiasts encounter hiccups along the way, so don’t be discouraged if your first attempts aren’t picture-perfect. Let’s tackle the most common challenges with practical fixes.
Separation issues often plague beginners making yogurt or soft cheeses. If your yogurt looks watery with liquid pooling on top, that’s just whey separating naturally. Simply stir it back in for a thinner consistency, or strain it through cheesecloth for Greek-style thickness. For cheese, separation usually means your milk got too hot too quickly. Use a thermometer and heat gradually, stirring gently to distribute warmth evenly.
Inconsistent texture is another frequent frustration. Grainy ricotta or rubbery mozzarella typically results from overheating or over-stirring during the curdling process. Think of dairy proteins as delicate guests at your kitchen party—they need gentle handling. Remove your pot from direct heat once curds form, and use a light touch when stirring. Temperature control is everything here, which is why caring for kitchen tools like thermometers and quality pots makes such a difference.
Timing troubles catch many newcomers off guard. Cultured products like yogurt need patience—rushing the incubation period yields thin, sour results. Create a cozy environment by wrapping your yogurt container in towels or placing it near a warm spot, then resist peeking for at least six hours.
Remember, even professional cheesemakers had batches that didn’t turn out perfectly. Keep notes about what worked and what didn’t, adjusting one variable at a time. Your kitchen is your laboratory, and each attempt teaches you something valuable about transforming simple milk into delicious homemade dairy creations.
Making your own dairy products at home is simpler than you might think, and the rewards go far beyond just great taste. Just like tackling that weekend paint job or installing new cabinet hardware, starting small builds confidence and skills you can expand on over time. If you’ve never made anything from scratch before, begin with something straightforward like homemade butter or a basic ricotta cheese. These beginner-friendly projects require minimal equipment and time, yet they deliver that satisfying sense of accomplishment you know from completing any hands-on project around your home.
The beauty of bringing these techniques into your kitchen is how they transform an everyday space into something more creative and purposeful. You’re not just cooking, you’re crafting quality ingredients that elevate your meals while saving money and reducing waste. Each batch you make teaches you something new about texture, flavor, and timing, skills that naturally improve with practice.
So grab that carton of cream sitting in your fridge and spend fifteen minutes making butter this weekend. Once you experience the freshness and realize how achievable it really is, you’ll find yourself eager to explore yogurt, soft cheeses, and beyond. Your kitchen deserves the same attention and innovation you give to every other room in your home.


