

Creating an L shape floral arrangement takes about 30 to 45 minutes and delivers a striking asymmetrical design that draws the eye while adding dimension to any room. You’ll build this arrangement in two distinct phases: first establishing a tall vertical line along one side of your container, then extending a horizontal line at the base to form that signature perpendicular angle. The technique relies on understanding focal points and visual weight rather than complex floral expertise, making it perfect for DIY enthusiasts ready to improve your home’s atmosphere with professional-looking results.
This classic design style originated in Ikebana, the Japanese art of flower arranging, where negative space matters just as much as the flowers themselves. The L shape works beautifully on side tables, mantels, or corner shelves because it naturally complements the lines of furniture and architectural features instead of fighting against them. You don’t need a florist’s training to master this arrangement. Armed with the right materials, a steady hand, and an understanding of the structural framework, you’ll create an elegant focal point that looks far more complicated than it actually is. The real magic happens when you learn to balance your blooms along those two key axes, creating movement and flow that transforms a simple vase of flowers into a thoughtful design statement.
Understanding the L Shape Design
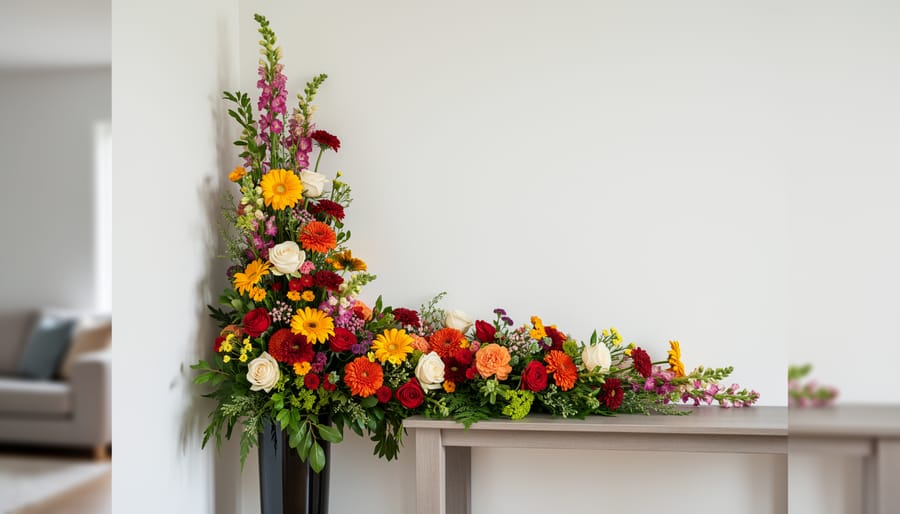
The L shape arrangement gets its name from its distinctive geometric form, a vertical line extending upward paired with a horizontal line stretching outward, creating that classic L silhouette. This asymmetrical design breaks away from the traditional round or triangular arrangements you might be used to, offering something more architectural and contemporary. The vertical line draws the eye up, adding height and drama to your space, while the horizontal line creates width and balance, preventing the arrangement from feeling too narrow or spiky.
What makes this design so visually compelling is how those two perpendicular lines work together to create movement. Your eye naturally travels from one line to the other, pausing at the intersection point where the drama unfolds. That’s where you’ll eventually place your showstopper blooms, the focal flowers that anchor the entire design. This deliberate path for the eye creates dynamic interest that static, symmetrical arrangements simply can’t match.
The beauty of L shaped arrangements is their versatility in home placement. They’re naturals for corner spaces where walls meet, fitting snugly without wasting the awkward angles that challenge other arrangement styles. Fireplace mantels become instant focal points when you position an L shape at one end, the design’s asymmetry adding sophistication without overwhelming the space. Console tables in entryways, corner shelves in living rooms, and even the edges of dining buffets all benefit from this arrangement’s ability to fill space vertically and horizontally while maintaining an open, airy feel.
Tools and Materials You’ll Need
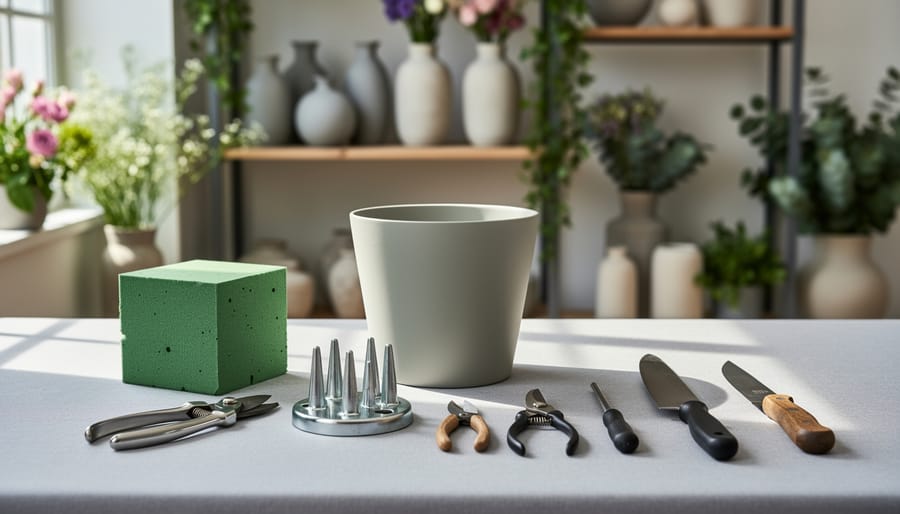
Gathering your supplies before you start prevents frustrating mid-project trips to the craft store and helps you work more efficiently. For an L shape arrangement, you’ll need a mix of structural materials, cutting tools, and the right flowers to bring your design to life.
- Container: A low, rectangular or oval vessel (6-8 inches long) works best, though any shallow container with a wide opening can work
- Floral foam: One block of wet floral foam (like Oasis brand), soaked until it sinks naturally in water
- Floral knife or sharp garden shears: Essential for making clean cuts at 45-degree angles
- Floral tape or anchor pins: To secure the foam inside your container
- Line flowers or greenery: Long, elegant stems like gladiolus, liatris, or eucalyptus branches to establish your L framework
- Focal flowers: 3-5 large blooms such as roses, peonies, or lilies for visual weight at the intersection
- Secondary flowers: Medium-sized flowers like spray roses, alstroemeria, or carnations to fill out the design
- Filler materials: Baby’s breath, waxflower, or small-leaf greenery to add texture and hide mechanics
- Clean bucket of water: For keeping stems fresh as you work
- Towel or plastic sheet: To protect your work surface from water and debris
When selecting your flowers, choose stems in varying stages of bloom. Some buds add visual interest and will open over time, extending your arrangement’s lifespan. Stick with three to five flower varieties maximum to avoid a chaotic look that undermines the elegant simplicity of the L shape. Your container should provide stability without overwhelming the design, so avoid anything taller than four inches or with a narrow opening that restricts your working space.
Safety and Preparation Tips
Before you dive into creating your L shape arrangement, take a few minutes to set yourself up for safe, mess-free success. Floral work involves sharp tools and materials that need a bit of respect, so let’s cover the essentials.
Always use sharp floral knives and shears on a stable surface, cutting away from your body. Dull blades require more pressure and can slip, increasing injury risk. If you’re working with roses, carnations, or other thorny stems, strip thorns from the lower portions before handling them extensively, a floral stripper tool makes this quick and prevents painful scratches.
Set up your workspace with protection in mind. Cover your table with plastic sheeting or a waterproof mat, because floral foam holds a surprising amount of water that will drip during arrangement. Keep a towel handy for wiping tools and mopping up spills. Position your container on a stable surface where you won’t accidentally knock it over mid-project. Having a small trash bag nearby for stem trimmings and debris keeps your workspace tidy and prevents slipping hazards on the floor. With these precautions in place, you can focus on the creative process without worrying about accidents or damage to your furniture.
Step-by-Step: Building Your L Shape Arrangement

Establishing the Framework
Start with your vertical line, this becomes the backbone of your L shape. Cut a stem of greenery (like leather leaf fern or Italian ruscus) or a line flower (such as snapdragon or delphinium) to about 1.5 times the height of your container. Insert it straight down into the foam, positioning it slightly off-center toward the back. This creates the upward movement that draws the eye.
Next, establish your horizontal line. Cut another stem to roughly the same length as your vertical piece, though you can go slightly shorter if your space requires it. Insert this stem into the foam so it extends outward at a right angle from your vertical line, creating that distinctive L shape. Aim for the stem to angle slightly downward, about 10 to 15 degrees below horizontal, so it appears to flow naturally rather than sticking straight out stiffly.
The intersection point where these two lines meet is your visual anchor. Both stems should emerge from roughly the same spot in the foam, though the horizontal piece can sit just slightly forward. This creates depth and prevents a flat, two-dimensional look.
Once your primary lines are in place, add one or two supporting stems along each line to reinforce the structure. Keep these shorter and closer to the foam than your main framework pieces. These support stems help define your L shape clearly while providing a foundation for the flowers you’ll add next.
Placing Your Focal Flowers
Start with the most dramatic bloom at the visual anchor point where your vertical and horizontal lines meet. This intersection is your arrangement’s power spot, it’s where the eye naturally lands first, so place your biggest, boldest flower here. Think of a fully opened rose, a large dahlia, or a statement peony. Position it facing slightly outward and angled toward viewers, not pointing straight up or hidden in profile.
Once you’ve established that central focal point, work outward along both lines of your L shape. Place your second-largest blooms about two-thirds of the way up the vertical line and two-thirds along the horizontal line. These secondary focal flowers create rhythm and guide the eye through the design, but they should be slightly smaller or less open than your center star. If you’re using roses, for instance, choose ones that are three-quarters open rather than fully blown.
Space matters more than you’d think. Don’t cluster all your show-stopping flowers together at the base. The vertical leg needs at least one substantial bloom higher up to draw the eye upward, while the horizontal leg benefits from flowers that gradually decrease in size as you move away from the intersection. This creates natural visual flow without making either line feel top-heavy or abandoned.
Turn your container as you work to check that focal flowers remain visible from the front viewing angle, not hidden behind greenery or twisted sideways.
Filling and Finishing
With your framework and focal flowers in place, it’s time to flesh out your L shape arrangement without losing its clean lines. This is where many beginners go wrong, adding too much too quickly and ending up with a rounded blob instead of that striking asymmetrical silhouette you’re after.
Start by selecting your secondary flowers. These should be smaller than your focals and in complementary colors. Position them at varying depths between your framework stems and focal points, angling each stem toward the center of the foam. Work in odd numbers, three or five stems of each variety, to create natural-looking clusters rather than a spotty effect.
Next, add your filler flowers like baby’s breath, statice, or wax flower. Insert these stems shorter than everything else, tucking them into gaps near the foam to hide any mechanics showing through. Keep filler concentrated near the base where the vertical and horizontal arms meet. This creates visual weight at the intersection while keeping your outer edges light and airy.
Step back frequently to check your silhouette from multiple angles. Your arrangement should still read as an L shape from across the room. If it’s looking too full, pull stems out, you can always add more, but it’s harder to subtract gracefully.
Finally, add a few trailing elements like ivy or asparagus fern along the horizontal arm to soften the edge and emphasize the sweeping line.
Final Touches and Water Care
Step back and view your arrangement from several angles, front, sides, and even from above. Look for any stems jutting out awkwardly or gaps that disrupt the clean L shape. Gently push in or trim any wayward stems so they blend smoothly with neighboring flowers.
Remove any fallen leaves, petals, or foam crumbs from the container rim and workspace. These bits detract from the polished look and can contaminate the water.
Now fill the container with fresh water until the floral foam is completely saturated. Pour slowly along the container edge, not directly onto the foam, which can create air pockets. The foam should feel heavy and spongy when properly hydrated.
Check water levels daily. Floral foam dries out faster than you’d expect, especially in warm rooms. Keep it consistently moist, never let it dry completely, as dried foam won’t reabsorb water effectively.
Checking Your Work and Maintaining the Arrangement
Step back and view your arrangement from several feet away, the L shape should be immediately obvious, with a clear vertical line rising from your container and a horizontal line extending perpendicular to it. Walk around to different angles. If the shape disappears when you move to the side, tuck in any stems that stick out awkwardly or add a few more flowers to fill gaps along the outer edges.
Check that your focal flowers at the intersection draw the eye first, then lead viewers along both arms of the L. If one side feels heavier, remove a bloom or two from the dense area rather than adding more to the sparse side. The negative space around your arrangement matters just as much as the flowers themselves.
For maintenance, check the floral foam daily by pressing it gently, it should feel damp, not dry or mushy. Add fresh water whenever the container level drops below the foam base. Mist the flowers lightly each morning to boost humidity, especially if you’re running air conditioning.
Remove any wilted blooms immediately by cutting their stems at the base rather than pulling them out, which can disturb neighboring flowers. Flowers naturally wilt from the outside in, so your arrangement will gradually shrink but maintain its L shape. Most arrangements last seven to ten days with proper care. Keep the display away from direct sunlight, heating vents, and fruit bowls, ripening fruit releases ethylene gas that speeds flower death.
Styling Ideas for Different Rooms
Your L shape arrangement works beautifully in multiple spots throughout your home, each showcasing different aspects of the design.
Corner accent tables are the natural home for this style. Position the vertical line toward the wall and let the horizontal element extend into the room, creating a welcoming gesture. Scale these arrangements smaller, around 12-18 inches tall, to avoid overwhelming compact spaces.
Fireplace mantels provide an ideal elevated stage. When you arrange a living room fireplace place your L shape at one end of the mantel with the vertical line reaching upward and the horizontal sweeping across. This asymmetrical placement balances other decor elements like candlesticks or framed photos on the opposite side.
Entryway consoles make powerful first impressions with L shape arrangements. Set yours off-center, allowing the design to greet guests without blocking sightlines or creating a barrier. Pair with a simple mirror behind to double the visual impact.
Buffet tables and sideboards benefit from taller, more dramatic versions. Create a 24-30 inch vertical line that commands attention during gatherings while the horizontal element connects to serving pieces or table settings.
Each placement adds a personal touch to every corner transforming functional furniture into styled focal points.
Common Questions About L Shape Floral Arrangements
Is this design suitable for beginners?
Absolutely. The L shape is actually easier than round arrangements because you’re working with clear lines and structure rather than trying to achieve symmetry. Start with hardy flowers like carnations and mums that are forgiving to handle.
What’s a reasonable budget for my first L shape arrangement?
You can create a beautiful arrangement for $25-40, including a basic container, floral foam, and a mix of flowers from your local grocery store or farmer’s market. Seasonal blooms and greenery from your yard will stretch your budget further.
How do I adapt this design for different seasons?
Swap your flowers and color palette to match the season: spring bulbs and pastels in March, bright sunflowers for summer, burgundy mums and wheat stalks for fall, and evergreen branches with white flowers for winter. The L shape framework stays the same.
Why does my arrangement look lopsided?
Check that your vertical line is truly upright and your horizontal line extends at a right angle. Step back and view from several feet away, minor imbalances become obvious from a distance, and you can adjust individual stems until the visual weight feels balanced.
The most common challenge beginners face is making the L shape too subtle. Don’t be timid with your framework stems, they should be obviously longer than your central flowers, creating unmistakable vertical and horizontal lines. If your arrangement just looks like a generic bunch with a few tall stems, lengthen those framework pieces until the L shape reads clearly from across the room. Another frequent question involves drooping flowers: this usually means you haven’t pushed stems deep enough into the foam or the foam has dried out. Each stem needs at least an inch of insertion depth, and the foam should feel damp (not soggy) when you touch it.


